Thursday, October 6, 2011

I should be reading for European History right now.

And yet, here I am.

I've missed you. Seriously. I've been so busy lately, and I haven't had the time to really cook anything. I'm so sad about that. But, anyway, I finally did it; I made my macarons. I feel like I've just been initiated into a whole new level of... foodiness. It feels awesome.


They don't look fancy, do they? That probably has something to do with the fact that I don't have a round piping tip. I had to just make it round as I piped the mixture on to the parchment. I tried.

I used a recipe I found on Tartelette. The original recipe was for blue chocolate-filled macarons. I didn't have any powdered food coloring, so I made white ones. I made two kinds of macarons--ones filled with bittersweet chocolate, and ones filled with orange curd. I was a little worried about the orange curd because my grandma (yes, she's here now) said that it wasn't sweet enough. But, I thought the meringue would be really sweet--and it is--so, I didn't change it. She thinks I did though. Shh.

French Macarons (from Tartelette)

3 egg whites
50 gr. granulated sugar
200 gr. powdered sugar
110 gr. ground almonds
2 Tb blue powdered food coloring

For the whites: the day before (24hrs), separate your eggs and store the whites at room temperature on a covered container. If you want to use 48hrs (or more) egg whites, you can store them in the fridge.
In a stand mixer fitted with the whisk attachment, whip the egg whites to a foam, gradually add the sugar until you obtain a glossy meringue. Do not overbeat your meringue or it will be too dry and your macarons won't work. Combine the ground almonds and powdered sugar in a food processor and give them a quick pulse. It will break the powdered sugar lumps and combine your almonds with it evenly. Add them to the meringue, give it a quick fold and remove some of the batter that will remain uncolored. Add 2 TB food coloring to the rest and fold the mass carefully until you obtain a batter that flows like magma or a thick ribbon.
Give quick strokes at first to break the mass and slow down. The whole process should not take more than 50 strokes. Test a small amount on a plate: if the tops flattens on its own you are good to go. If there is a small beak, give the batter a couple of turns. Do the same for the plain batter.s
Fill a pastry bag fitted with a plain tip with the batter and pipe small rounds (1.5 inches in diameter) onto parchment paper baking sheets.
With a toothpick dab dots of the plain batter and swirl.
Preheat the oven to 300F. Let the macarons sit out for an hour to harden their shells a bit and bake for 8-10 minutes, depending on their size. Let cool.
If you have trouble removing the shells, pour a couple of drops of water under the parchment paper while the sheet is still a bit warm and the macarons will lift up more easily do to the moisture. Don't let them sit there in it too long or they will become soggy. Pipe or spoon some ganache on one shell and sandwich with another one.

Chocolate Ganache

3/4 cup heavy cream
1 cup bittersweet chocolate

In a heavy saucepan set over medium heat, bring the heavy cream to a boil. Remove from the stove and add the chocolate to it. Let stand 2 minutes and then stir until fully combined. Let cool until firm enough to put in a small piping bag.


Don't you just love the gloss on perfectly whipped meringue?
I was really scared about messing up the meringue when I had to fold in the sugar and almond flour mixture. But, I  guess it did have to "deflate" a little and become a little liquid for this thing to work.


I did not mess up. Look at the cute little cookies! Look at them! Oh, and don't they have great feet? I was really afraid that they wouldn't come out looking like they did. Please give them that one hour to set before baking. It makes a difference; trust me.


I have to go back to being a student now. I have a quiz over the Thirty Years War tomorrow. Happy baking, everyone.

Monday, August 29, 2011

Because everyone needs study breaks

Hello there! It has been a while, hasn't it?
I've been really busy with homework, so I haven't had the chance to post anything new. I have been cooking though. I promise.

It was my art teacher's birthday last week.

So, I made him some orange bars. That's right. Orange bars. I was going to make some cupcakes, but some other girl beat me to it.  And, plus, who gets orange bars for their birthday? It was a safe bet.

I found this recipe on Sweet Tooth. What a cute little website. I love that she's a dental student, too.
Anyway, he loved the orange bars--as he should. They were tasty. Click here for the recipe.

So, let's get to the main attraction--crack pie. It's very aptly named. First of all, it is that good. Second of all, just like cocaine, this thing should be illegal.
This is one of those things that you should never make for yourself. The amount of calories in this thing is pretty hardcore. So, you'll most likely end up with a whole pie that you either a) eat all by yourself, or b) feel guilty about eating because you know what's in it. Neither of those are good. So, I think I made the right decision in making this once school has started. That way, I can give some of it away.

For those of you who has not been introduced to this pie yet, here's a brief rundown. The mad genius behind the crack pie is Christina Tosi, the pastry chef and owner of Momofuku Milk Bar in New York. She's a great lady. She just has to be.

The crack pie is very similar to a butter tart, but better. Unlike an ordinary butter tart, the crust for this pie is made from crumbled oatmeal cookies. So, as you're biting into it, you get the sticky and kind of gooey brown sugar and butter filling, and you also get a chewiness that comes from the oats. It's remarkable.

Momofuku Milk Bar's Crack Pie

Crust
9 tbs of room temperature butter
5 1/2 tbs of brown sugar
2 tbs of sugar
1 large egg
3/4 cup plus 2 tbs of old-fashioned oats
1/2 cup of flour
1/8 tsp of baking soda
1/8 tsp of baking powder
1/4 tsp of salt

Filling
3/4 cup of sugar
1/2 cup of brown sugar
1 tbs of non-fat milk powder
1/4 tsp of salt
1/2 cup of butter, melted
6 1/2 tbs of heavy whipping cream
4 large egg yolks
1 tsp of vanilla

  1. Preheat your oven to 350 degrees Fahrenheit. Line a medium sized baking sheet with parchment paper.
  2. Beat 6 tbs of butter with 4 tbs of brown sugar and 2 tbs of sugar in a medium bowl until fluffy. Add egg and beat until the mixture turns pale. Add oats, flour, baking powder, baking soda, and salt. Mix until everything is nicely combined.
  3. Turn the mixture out on to the prepared baking sheet. Spread out the dough until it comes close to the edges of the pan, and bake for 17 to 18 minutes. Cool on a rack.
  4. Using your hands, crumble the giant oatmeal cookie into a large bowl. Add the leftover butter and brown sugar, and mix with your hands until the mixture is moist enough to stick together.
  5. Transfer the mixture into a 9 inch pie dish and press it evenly on to bottom and up the sides of the dish. Place the dish on a baking sheet.
  6. For the filling, Whisk both sugars, milk powder and salt in a medium bowl. Add melted butter and whisk until combined. Add cream, egg yolks, and vanilla. Whisk until you get a smooth mixture, and pour it into the crust.
  7. Position rack in the center of your oven. Bake the pie for 30 minutes at 350 degrees. Reduce oven temperature to 325 degrees Fahrenheit. Bake for another 15 to 20 minutes, or just until the filling is set around the edges but still moves slightly in the center when the pie dish is gently shaken.
  8. Cool the pie for 2 hours on a rack. Chill uncovered overnight.
Yes, you have to wait until the next day to eat this thing. It's well worth it, though.


I was right about this pie being calorie ridden, right? I still can't believe how much butter and sugar went into this thing. Oh, and cream. The cream!


I love that. Don't you? The way the cream kind of makes this rich, white cloud in the brown sugary mixture. I live for that--which is kind of glorious, don't you think? No? Oh. Okay.


The original recipe said that a little bit of bubbles are okay, so I didn't worry too much over them. Plus, I was going to put powdered sugar all over the top anyway.


I've been getting rave reviews from everyone. So, try it for yourself and let me know how it goes. Happy baking! :)

Saturday, August 13, 2011

Gruyere Popovers


Wonderful, right? I was so proud of myself for pulling this off using a muffin tin. I saw pictures of different attempts, and most of the popovers either didn't rise, or only rose about 1/2 inch.
I have quite a bit of milk left in the fridge, and I honestly thought that this would use up most of it. Nope. I think I need to make some kind of curd or cream some time soon.

Surprisingly, I don't have a smart story about popovers. I've never made popovers before, and neither has my mother. So, I got nothin'.
I found this recipe on Bon Appetit. I've been cooking a lot of recipes from there nowadays. I feel a little odd. Anyway, the recipe is fairly simple. Not a lot of fuss. That's why I liked it in the first place.

Gruyere Popovers (adapted from bon appetit)

2 cups of flour
1 1/4 tsp of salt
2 cups of whole milk
4 large eggs
1 1/2 cups of grated Gruyere
A little bit of butter
  1. Place two 12-cup muffin pans and one 6-cup muffin pans in the oven. Preheat to 350 degrees Fahrenheit. 
  2. Sift flour and salt into a medium bowl. Then, heat the milk over medium heat until it reaches about 125 degrees Fahrenheit.
  3. In a large bowl, whisk the eggs. Then, gradually whisk in the warm milk. Whisk in the flour mixture just until everything is combined. The batter may still be slightly lumpy. Please avoid over mixing!
  4. Remove the hot muffin pans from the oven, and brush every other cup with butter (generously). If you don't bake the popovers in every other cup, they won't rise properly. So, please just wash a couple of extra pans. It's worth it.
  5. Use a measuring cup to pour 1/4 cup of batter into the greased muffin cups. You should have exactly the amount of batter to make 16 popovers. Then, top each of the popovers with 1 1/2 tbs of cheese. Bake them for about 40 minutes. DO NOT PEEK. They'll deflate. Once they are done, remove from the pan immediately to cool.

As you can see, I was lazy. I did not get out an extra pan. And, see? Half of them didn't rise properly. So, trust me; I know what I'm talking about. As far the taste, they were all great. They're like huge profiteroles. Except cheesy. And, I had an urge to sop up some sort of sauce with it. Is that wrong?

I did have one problem, though.

I had cut the recipe in half and made only eight popovers. Seven of them turned out like that--bottomless. I only got one perfect popover out of eight. So, to get a dozen perfect ones, I would've had to make... 96?

Look at that one perfect popover. It even has an ass. If any of you know what I did, or didn't do, that caused this, please put it in a comment. Sharing is caring.

Monday, August 8, 2011

Back to life, back to reality...

You know that song, right? The one by Soul II Soul?
Is it stuck in your head now? Good. School's starting on Monday.

I had a hankering for cake. Not like the gooey, super rich, slathered-in-icing type of cake, though. I wanted a simple cake. Nothing fussy. I wanted something my grandmother or my mother would make. Rich, but not too sweet. I found a recipe at Bon Appetit for a yogurt pound cake. It sounded awesome.

I honestly didn't expect on making a post out of this. I wanted cake, and so did my uncle. I was just going to make it, and eat it together tonight. I didn't even take any pictures before I baked the cake.
But, as I was making it, it reminded me so much of the yellow cake my mother would make. My grandmother made the recipe, I think. My mother came from a low-middle class family, and sometimes, they just didn't have a lot of money lying around come the children's birthdays. So, my grandmother would bake their cakes, and my grandfather would go out and buy them something nice.
It's lovely that something so great came out of fairly difficult times. I think that's why it's so beautiful in the first place.

Yogurt Cake with Honey Glaze (adapted from bon appetit)

1 1/2 cups of flour
2 tsp of baking powder
1/4 tsp of salt
1 cup of plain yogurt
1 scant cup of sugar
3 large eggs
1 tsp of orange zest
1/4 tsp of vanilla extract
1/2 cup of vegetable oil
about 3 tbs of honey
1 tsp of water

  1. Position a rack in the center of your oven and preheat to 350 degrees Fahrenheit. Generously butter an 8 1/2 inch loaf pan, or a bundt pan. Or, you can just use an angel food cake pan like I did.
  2. Into a bowl, sift flour, salt, and baking powder. In a large mixing bowl, combine eggs, sugar, yogurt, orange zest, and vanilla. You can use a whisk, but I used a hand mixer to speed up the process.
  3. Then, gradually whisk in the dry ingredients. I didn't dare use a mixer for this part. I tend to over-mix my batter sometimes.
  4. Fold in the oil using a spatula. Then, transfer the batter on to the prepared pan, and place the pan on a baking sheet. Bake for about 40 minutes, or until a toothpick comes out clean. 
  5. For the glaze, put the honey and water in a microwave safe bowl, and pop it in the microwave for about 20 seconds. After the cake is done baking, put it on a cooling rack, and brush the hot glaze over it. Let the glaze cool and set before cutting.

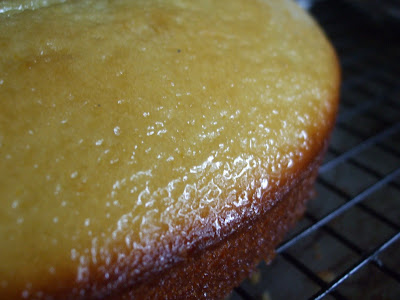
The smell of orange and vanilla wafted out of the oven. It was nice. Do let the glaze set properly. If you don't, you'll end up with a nice pound cake with a soggy crust. If you do, you should have a sticky, slightly crunchy crust around the soft, spongy cake.


Happy baking.

Wednesday, August 3, 2011

Peach and Ginger Flaugnarde: An Ode to Summer

I hate summer. Especially summer time in the South.
It was around 105 degrees Fahrenheit this afternoon. Absolutely unnecessary and uncalled for. I don't care if it really is just God hugging us closer.

Why an ode to summer then?
Well, I've read other bloggers going on and on about how a clafouti is just a must-have for the summer. It's almost sacrilegious to be a foodie and not eat it at least once during this season. Too bad I couldn't find any cherries at the store. But, I did find peaches. And, that works, right? You would think so. But, no. Because a clafouti is strictly made from cherries. So, I made a flaugnarde instead.
Other than the type of fruit being used, I honestly don't get what the difference is between the two. It's pretty much the same thing. Really.

I guess that still doesn't explain my ode to summer. So, I'm just going to go right out and say this. This is my desperate attempt at hanging on to my break. School's starting on the 15th, and I'm already getting kind of depressed. I thought that maybe this would keep me in summer mode.


Anyone here know Presidents of the USA? They had a song called "Peaches". You know, I'm movin' to the country, I'm gonna eat me a lot of peaches? No? Come on, no 90s baby here?

Well, I was thinking of that song as I was making this. It's a nice little song. And, I have feeling that it's not at all about peaches...

I found the recipe here. I was immediately intrigued. Peaches and ginger? That's classic.
It was supposed to be made with yellow peaches, but I couldn't find any at that day, and I didn't really feel like using nectarines. So, I decided to use the white peaches. I like them. They're pretty.

Peach and Ginger Flaugnarde

3 to 4 peaches
100 ml of whole milk
25 ml of cream
3 eggs
60 grams of sugar
35 grams of flour
2 cm of grated fresh ginger (that's about 1 inch, folks)
3 tbs of cold butter

  1. To prepare the peaches, fill a large bowl with boiling water, and another large bowl with ice water. Cut one peach in half (like in the previous picture) and plunge it into the hot water for one minute. Take it out and place in the ice water bath for one minute. Then, gently peel back the skin. Using a pairing knife would be very helpful. Cut each of the halves into four. Now, prep the other ones.
  2. For the batter, beat the 3 eggs. I used a hand mixer, but a nice whisk should do the job just fine. Add milk, cream, the grated ginger, and sugar. After the sugar is all combined, add the flour and beat just until everything is combined.
  3. Preheat your oven to 400 degrees Fahrenheit.
  4. Grease a tart pan or a baking dish generously with butter. What's the point of making this if you're going to let it stick to the pan, right? Now, pour in the very liquid batter. Arrange the peaches in the baking dish. 
  5. Cut the cold butter into 1 cm cubes and place evenly around the dish. Sprinkle some extra sugar on top, and bake for 25 to 30 minutes.
The thing does deflate. Don't worry. That's just the way it is.

I love that little bit of pink on the peaches. So pretty. I feel so healthy for eating all this fruit.


Tuesday, August 2, 2011

Chicken Tandoori...supposedly

I've always been kind of freaked out by the red chicken. I mean, I eat it, but I had no idea what was on that chicken. Is it food coloring? Is it some kind of spice? Does the tandoori oven turn it red? No idea.
So, since I had some garam masala lying around in the cupboard, I thought I might as well learn how to make it.

Some people actually use red food coloring. I was surprised. The traditional recipes, however, use annatto seed paste--otherwise known as achiote. I usually see achiote in Latin American dishes, so I was really surprised when I read about this. But, being the amateur that I am, I don't have that in my cupboard. I mean, really, I don't ever use it for anything. Therefore, my chicken was not red. It just looked like roast chicken. It smelled ten times better than regular roast chicken though.
Creepin' on the chicken...
I've gotten very addicted to bon appetit lately. What a great magazine. I spent a whole day online last week, looking at their recipes. What great pictures they have!

bon appetit's version
I don't know what the heck they did to make it look that way. I love the tinge of orange on those chicken.

Easy Tandoori Chicken (adapted from bon appetit)

1 cup of plain, whole-milk yogurt
1/4 cup of chopped fresh cilantro, or 2 tbs of dried
3 tbs of oil
1 generous tbs of garam masala
2 to 2 1/2 tsp of salt
1 large garlic clove, smashed
8 pieces of chicken thighs (Man up; use dark meat.)
1 medium-large red onion (I like red onions better.)

  1. To make the marinade, mix yogurt, cilantro, oil, garam masala, and garlic. Set aside.
  2. The original recipe asked for 2 tsp of salt mixed into the marinade. But, I like sprinkling the salt directly on the chicken so that I know how much salt each chicken is actually getting. So, do it whichever way you like.
  3. To marinate, get a gallon-sized Ziploc bag and place the chicken pieces and the marinade inside. Get as much air out of the bag as you can and seal it. Move it around with your hands so that each piece of meat is covered with the yogurt mixture. Leave it in your fridge for 24 hours.
  4. When you are ready to roast, preheat your oven to 400 degrees Fahrenheit.
  5. Slice the onion into 1/8 to 1/4 inch slices, and spread on to a rimmed baking sheet. Lay the chicken pieces on the onions and roast for about an hour, or until juices run clear when the biggest piece of meat is pierced with a knife.

See, told you. It looks like regular roast chicken. I love the color on that skin though. I think Ina Garten would be proud. Now, just serve the chicken with the sweet, roasted onions, and maybe a little bit of rice. That sounds like a wonderful evening.


Bon appetit, y'all.

Friday, July 22, 2011

What's crispy, spicy, and completely wonderful?

Samosas. That's what. Easiest riddle ever.


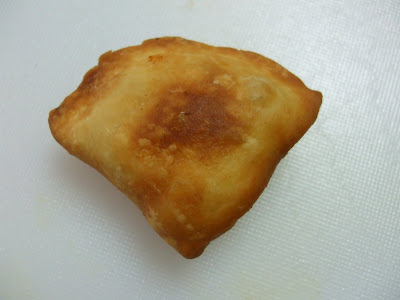
Look at that crispy, golden brown goodness. Slightly flaky pastry outside, and fluffy spiced potato filling inside. It's delicious.

I made this samosa to try out my homemade garam masala. I thought that the samosas were going to be just some kind of vehicle for the spices. You know, just a vessel. But, no. Oh, no. It was so much more than that. It's a superstar in its own right.
I wasn't in the mood for meat (weird, right?), so I made some vegetarian samosas instead. The filling was supposed to have potatoes, carrots and peas in it, but I didn't have the latter two ingredients. So, I settled for just potatoes. Don't worry. It's still awesome.

The recipe said that it would make about 24 medium sized samosas. I wouldn't know about that since I made bite-sized ones. So, try it out and see how it works out for you. The dough was wonderful. Most people say that samosas are difficult to make, but I didn't find it that troublesome. The dough was wonderful, and definitely one of the friendliest dough I've ever worked with.
The original recipe for the filling (click here) is wonderful, but I didn't have a couple of the ingredients on there. So, I just adjusted it according to the things in my cupboard.

Vegetarian Samosas

Dough

  • 225 gr of flour
  • 2 tbs of oil
  • 2 tsp of salt
  • 80 ml of water

Filling

  • 2 large potatoes
  • 2 green onions
  • about 1/2 inch of ginger, smashed
  • 2 green chilies, finely chopped
  • 3 tbs of oil
  • 1/2 tsp of garlic, minced
  • 1/4 to 1/2 tsp of ground coriander
  • 1/2 tsp of turmeric (if you have dried sliced turmeric, use 2 to 3 pieces)
  • 1/2 tsp of garam masala
  • 1/2 tsp of chili powder
  • 1/2 to 1 tsp of salt
  1. For the dough, combine flour and salt in a large bowl. Make a hole in the center of the mixture and pour in the oil and the water. You'll need all of it. Then, use a fork to combine. After a couple of minutes, go in there with your hands. Dump on to a clean surface, and knead into a smooth ball. Cover and let sit at room temperature for 30 minutes.
  2. Boil the potatoes for about 15 minutes, or until they just become fork tender. Don't make it mushy! After that, use a fork to break up the potatoes into small, crumbly pieces. Don't mash it completely.
  3. Saute the garlic, green chili, ginger, and coriander in oil for a minute.
  4. Add the green onions and let it cook for a minute or two. Add turmeric, chili powder, salt, and garam masala. Let it cook for about 2 minutes, and add the cooked potatoes. Only cook until everything is nicely combined.
  5. After the dough has rested for 30 minutes, divide it into two parts. Then, the divided the two parts into six portions.
  6. Roll out each portion into a circle as best as you can. Mine were jacked up, too. Don't worry. Cut the circles in half, making two half moon shapes. Take one of them and brush the straight edge with water. Don't overdo the water; it'll make your dough mushy and more prone to tearing when you stuff it. 
  7. After brushing it with water, fold it over and crimp it together to make a cone. Open it up, and insert about 1 tbs of filling. Brush the inner edges of the top of the cone with water and crimp it up nice and tightly.
  8. Fry the samosas on low to medium heat until they are golden.

The frying part is a little tricky. You kind of have to watch the temperature with these guys. If the oil is too hot, the shell will start to form bubbles that look like tiny blisters. You don't really want that. If the oil isn't hot enough, the thing won't really puff up. So, uh, good luck with that.

Thursday, July 21, 2011

Making your own garam masala...

I have a hankering for spicy foods right now. Like, I want some--badly.

Most Indonesian dishes use a lot of spices. We love us some spices. I remember when I was in elementary school, I was in pramuka, or Cub Scout. One day, we were told to prepare for an outing, and one of the things the instructor told us to do was to go home, and sniff some spices. We were weirded out also. So, I went home, and rummaged through in our family's spice baskets (Yes, that's how much we use them).
Sure enough, on the outing, they asked us to identify around 15 different spices by sniffing them. I owned.
I got everything right--galangal root, tumeric, fingerroot, cutcherry, and so on--except for two. I confused shallots for onions. Big deal. I was feeling pretty good about myself. But, then again, I think I had an advantage because I probably helped out my mom more than the other girls helped out theirs. Not my fault.

Anyway, I made some homemade garam masala today. For those of you who don't know what it is, garam masala is a spice blend that's very important in Indian cuisine, especially Northern Indian cuisine. The blend usually has cumin, coriander, cardamom, cloves, and etc. It's very pungent stuff.

Garam Masala (makes about 1/4 cup)

1 tbs of cumin seeds
1 tbs of coriander seeds
1 tbs of cardamom
1 tbs of black peppercorns
1.5 inches stick of cinnamon
1/2 tsp of whole cloves
1/2 tsp of grated nutmeg

  1. In a small skillet, toast cumin, coriander, cardamom, peppercorns, cinnamon, and cloves over medium-high heat for about 5 to 7 minutes. Don't try to be smart and turn up the heat! You'll burn the spices instead of cooking them through!
  2. Pulverize the toasted spices along with the grated nutmeg. You can use a coffee grinder or a small food processor. But, if you have a mortar and pestle, please utilize it. I did most of the work using a small grinder, but there are just some things your grinder won't get. I had to use a mortar and pestle to get a finer powder. 
  3. Store in a Tupperware in a cool, dry place. It'll keep for about 3 months.
Seriously, use a mortar and pestle if you have one
Finished product
It's now ready to be used in all sorts of different dishes--chana masala, tikka masala, samosas, tandoori chicken, dahl, and etc.

The best omelette on the face of the planet...

Though I have not posted, I have been cooking. I made this about a week ago.
The Spanish tortilla is a giant omelette traditionally made with potatoes. It's very simple and very delicious, and it's usually found in various tapas bar in Spain. This was my attempt at it.
cooked potatoes

I saw the recipe for it in NY Times, and well, it turns out that you don't really need a freaking recipe for it. It's that simple. Just potatoes, eggs, onions, salt and pepper.

Spanish Tortilla

3 or 4 medium sized potatoes
2 medium sized shallots, thinly sliced
5 to 6 eggs
salt and pepper
oil to fry


  1. Peel and thinly slice the potatoes. It is faster to use a mandolin, but since you don't really want paper thin slices, a knife will suffice. You want 1/8 inch slices. Submerge in water to prevent discoloration.
  2. Heat oil in a 8 to 10 inch nonstick skillet. To test the temperature, put a slice of potato in the oil. If small bubbles appear around its edges, the oil is ready. Fry the potatoes just until they are tender, not brown!
  3. Take the potatoes out and drain on a paper towel. Reserve around 2 tbs of the oil for frying the omelette later. Let the potatoes cool for a couple of minutes before mixing it with the eggs, salt, and pepper. Remember that during this stage, you are seasoning the whole thing!
  4. Heat the skillet back up over medium heat. Sautee the shallots in reserved oil until it becomes soft.
  5. Add the egg and potato mixture. As soon as the edges firm up, lower the temperature slightly, and cook for 5 to 6 minutes.
  6. Insert a spatula around the edges of your omelette to loosen it from the pan. Slide it off on to a large plate, one that would cover the top of your pan. Carefully put the top of your skillet on top of the omelette, and flip it over. There's enough residual oil on the skillet to cook the other side. Don't worry!
  7. Cook the other side for 5 to 6 minutes, and slide it off on to a plate. Serve at room temperature. 
It's almost always served with bread, specifically bocadillo. I didn't have any baguette or bocadillo laying around the house, but I did have my potato bread. It's extreme potato bonanza.

Delicious.